
Correct Way of Measuring Length
📚 Key Concepts
🔹 Choosing Appropriate Measuring Tools
Different Tools for Different Purposes:
- 15-cm scale: Small objects (pencils, erasers, small books)
- Metre scale/rod: Room dimensions, furniture, height measurements
- Measuring tape: Long distances, curved measurements, tailor measurements
- Flexible tape: Body measurements, curved lines, irregular shapes
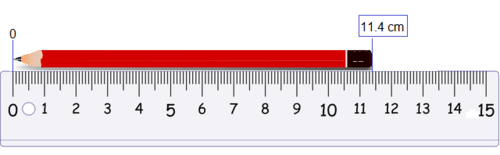
🔹 Rules for Accurate Measurement
1. Correct Placement of Scale:
- Place scale in direct contact with the object
- Scale should be parallel to the length being measured
- No gap between scale and object
- Scale should be straight and not bent
2. Correct Eye Position:
- Eye should be directly above the point being read
- Avoid parallax error (error due to incorrect viewing angle)
- Look perpendicular to the scale surface
3. Handling Broken Scales:
- If zero mark is damaged, start from any clear marking (e.g., 1.0 cm)
- Subtract the starting reading from the final reading
- Example: Object from 1.0 cm to 8.5 cm → Length = 8.5 – 1.0 = 7.5 cm
4. Recording Measurements:
- Always include the unit with the number
- Leave a space between number and unit: “25 cm” not “25cm”
- Use appropriate decimal places based on scale precision
- Example: 12.5 cm, not just 12 cm or 13 cm
🔹 Special Considerations
For Visually Challenged Students:
- Scales with raised markings (Braille scales)
- Tactile measurement tools
- Audio measuring devices
Measuring Curved Lines:
- Use flexible measuring tape
- Use thread method: Place thread along curve, then straighten and measure
- Digital tools: Curved line measurement apps